31 January 2018
February Pledge
February Pledge - as made in the Pledge, Paint or Pay motivation group.
Always working towards a specific game day or project, my 'I want to do this one day' pile is getting really big. So I'm having a clear out month on individual not-really-need-it models.
From left to right:
2x Vindicare Assassin, Inquisitor Eisenhorn, Forge Father God Father, Brokkr Bike, Teraton Scientist
9 Mass Effect conversions
Ragnar Lodbrok, Chaos Dwarf Bezerker, Viking, Goblin Spy, Geralt of Rivia, 3x Dwarfs
Dungeon Saga Legendary Necromancer, Barbarian, Elf, Dwarf, Mage
In all 28 model - one for each day in February.
And as of January 2018, this is the yearly Bingo Sheet.
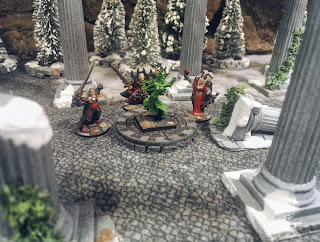
Dungen Saga: Elshara the Elven Banshee and ghosts
Elshara is a very nice banshee miniature, has the right feel to it. Reminds me of the description of the Dark Elf ghost in Dragonlance Chronicles. She's in agony.
The ghost are real classical. Ball and chain - couldn't be more traditional horror story.
Quick paintjobs. The banshee was base coated green and drybrushed with luminescent paint from Vallejo. The ghost are grey and black, with the same luminescent gren on the inside. The semi glowing effect is hard to capture with the camera.
Based like my other Dungeon Saga miniatures. Differenct greys and brown on the cobble stone. Birch tree seed leaves, some green and brown tufts.
The Ghost models will also serve as Frostwraiths in Frostgrave. As they frostwraith are not immaterial and these model look more that.
28 January 2018
Frostgrave: Witch and Apprentice
Currently I'm playing with a Witch in Frostgrave. It's nice to play something other than an 'elemental bolt' wizard. This guy is mostly running support on his own guys, brewing potions and controlling animals on the field.
The wizard is an old Games Workshop chaos sorcerer. I got the model in a lucky Ebay deal for only €1. A heavy chunk of metal this one, and almost filling out his 25mm base. I guess he'll tamper with some demonic magic at some point, he certainly looks that way.
His apprentice is a resin model, don't know where he's from. It was a freebie from my hobby stuff supplier King Games. He (or perhaps she) is also showing his status by carrying around his maters big book.
Went with some natural, wooded colours fitting for witches. Brown base coat and a few other colours added to them.
26 January 2018
Terrain Tutorial: Stone platforms
Frostgrave terrain need lots of line of sight blocking terrain. During some games, I found that my terrain didn't offer quite enough LOS block. So I've made some cheap platforms from scrap materials. They'll allow me to make 'cannals' and get higher terrain. I've made three, and as they are rather large, they cover half a 3'x3' board.
To see the photos of the finished platforms, go to the bottom of the post.
Materials and tools
- Polystyrene (mine is free and recycled).
- Cardboard ('frozen pizza' boxes)
- PVA glue
- Cheap acryllic paint
- Sand
- Hot Cutter (mine is a 10$ cheap one from china)
- Snow: Mixed PVA glue, baking powder and white acryllics.
Step 1:
Take the polystyrene and arrange it in some large shapes. Make sure to incorporate some nice broad stairs into the design. I've made sure the stairs have room for a 40mm base, so models won't fall all over the place. Glue the polystyrene (I've used 2x 1'' boards) together and to a card board base. Use lots of glue and put it under pressure until dry.
I always add cardboard bases under my polystyrene terrain for some much needed strength.
Step 2:
Using the hot cutter, cut some nice big stone patterns into the platform. I've made the stone work plenty big. Mixing the size of stones, switching between square blocks and cobble stone. A lot of the final detail is secured at this point.
Step 3:.
Mix PVA glue, dark grey (near black) acryllic, a tiny bit of sand and some water. Paint it into all the deep areas on the build. The glue help strengthen the polystyrene build.
Step 4:
Make a mix like above but in a lighter colour and with a bit more sand in it. Paint all your platforms. I paint random stones on the platforms. When I run out of paint mix, I try to get a new nuance in the next mix. So there'll be a nice mix by the end.
Step 5:
Use some Agrax Earthshade on areas painted in non-grey colours (sand and grey on my builds). Add snow mix, edge highlights (done quickly with a large brush) on the stones and other detailing. I've been using a bit of flock, basing flowers and added some old Games Workshop 'Ruined Temple' skulls.
Showcase
Platform 1
Platform 2
Platform 3
Take the polystyrene and arrange it in some large shapes. Make sure to incorporate some nice broad stairs into the design. I've made sure the stairs have room for a 40mm base, so models won't fall all over the place. Glue the polystyrene (I've used 2x 1'' boards) together and to a card board base. Use lots of glue and put it under pressure until dry.
I always add cardboard bases under my polystyrene terrain for some much needed strength.
Using the hot cutter, cut some nice big stone patterns into the platform. I've made the stone work plenty big. Mixing the size of stones, switching between square blocks and cobble stone. A lot of the final detail is secured at this point.
Step 3:.
Mix PVA glue, dark grey (near black) acryllic, a tiny bit of sand and some water. Paint it into all the deep areas on the build. The glue help strengthen the polystyrene build.
Step 4:
Make a mix like above but in a lighter colour and with a bit more sand in it. Paint all your platforms. I paint random stones on the platforms. When I run out of paint mix, I try to get a new nuance in the next mix. So there'll be a nice mix by the end.
Step 5:
Use some Agrax Earthshade on areas painted in non-grey colours (sand and grey on my builds). Add snow mix, edge highlights (done quickly with a large brush) on the stones and other detailing. I've been using a bit of flock, basing flowers and added some old Games Workshop 'Ruined Temple' skulls.
Showcase
Platform 1
Platform 2
Platform 3
25 January 2018
Dungeon Saga: Dwarf Revenants and Grund
There's nothing but cool about the undead dwarf models in Dungeon Saga, we see this way to little. The models reminds me of those very old undead Dogs of War from Warhammer.
I did a little reposing on one axe arm with hot water. I tiny conversion, but easy to do. As always I went with different colours on these guys.
Grund is such a lovely model. It's a well designed model to look regal as a dwarf king, while being undead.
I did a little reposing on one axe arm with hot water. I tiny conversion, but easy to do. As always I went with different colours on these guys.
Grund is such a lovely model. It's a well designed model to look regal as a dwarf king, while being undead.
19 January 2018
40k: Malignant Plague Caster
The Malignant Plague Caster is a chaos sorcerer for the Death Guard. At first i really disliked the face on the model, but painted it looks okay. I some regards he's better than a regular sorcerer, because he inflicts extra damage when doing good die rolls. ... I just tend to forget all those special rules.
15 January 2018
Frostgrave: Photo post
A post with lots of photos from projects finished in January 2017. Click the photos for larger versions.
For all my posts on Frostgrave models and terrain click here.
Terrain Tutorial: Pillars
I've made some ancient civilization style pillars for my games of Frostgrave. It was a nice little project to do, cheap and good looking. For this project I've gone with colours and style matching my other Frostgrave stuff. But I might do these for Ghost Archipelago - in sand stone colours. Would also work for some easy Gangs of Rome terrain.
Showcase photos in the bottom of the post or in this (with other photos as well) picture post.
Step 6:
Do the same with the broken pillars. I've made clean cuts, so it's easy to cover with a disc piece.
For the broken pillars I've added som tiles to the base and spread sand on it, while the glue was wet.
Step 7:
For painting I've base coated with a cheap grey spray. Washed the pillars in Agrax Earthshade and drybrushed it all light grey.
Step 8:
Add some greens. I use green flock for crawling ivy style plants. And add snow. I make my own snow paste from a mixture of wood glue, water, white acryllic paint, baking powder and white aquarium sand.
Step 9:
I frostcoat all my Frostgrave terrain with a white spray. Sprayed in short bursts from 60cm (2') distance. Gives a nice look, like on a really cold morning - and dulls the green flock. After this I add brown grass and winter flowers .
Showcase
The fun 'playing with dolls' part. Putting it all up and taking some nice photos. Snow shots done with the app 'Just Snow'. Gaming mat by Ceri Design (cheap felt mats).
Materials
- Wedding cake pillars. Found mine on Ali Express for less than 1$ per pillar.
- Cork sheet. You can use cheap a trivet from Ikea.
- Iron bolt, nut or screw
- Plastic card
- Super glue
- Bases: Cardboard, flock, woodglue
Step 1:
Having scatter terrain fall over is the worst! I hate it. So I always try to add bases to it (like pallets for modern scatter). I've used some 4mm cork sheet. Draw up some squares a bit larger than the base of the pillars.
Step 2:
Having scatter terrain fall over is the worst! I hate it. So I always try to add bases to it (like pallets for modern scatter). I've used some 4mm cork sheet. Draw up some squares a bit larger than the base of the pillars.
Step 2:
Cork can break to easily, so glue some cardboard beneath it. I use woodglue. Put a book on it, while it dries.
Step 3:
Cut out the bases. To be absolutely sure these won't fall over, I've super glued som old iron screws to the cork bases. The pillars are hollow, so it's no problem.
Step 4:
Glue the pillars to the bases. I cut up two pillars for some broken ones. Made some thin cardboard bases for those.
Step 6:
Do the same with the broken pillars. I've made clean cuts, so it's easy to cover with a disc piece.
For the broken pillars I've added som tiles to the base and spread sand on it, while the glue was wet.
Step 7:
For painting I've base coated with a cheap grey spray. Washed the pillars in Agrax Earthshade and drybrushed it all light grey.
Step 8:
Add some greens. I use green flock for crawling ivy style plants. And add snow. I make my own snow paste from a mixture of wood glue, water, white acryllic paint, baking powder and white aquarium sand.
Step 9:
I frostcoat all my Frostgrave terrain with a white spray. Sprayed in short bursts from 60cm (2') distance. Gives a nice look, like on a really cold morning - and dulls the green flock. After this I add brown grass and winter flowers .
Showcase
The fun 'playing with dolls' part. Putting it all up and taking some nice photos. Snow shots done with the app 'Just Snow'. Gaming mat by Ceri Design (cheap felt mats).
Subscribe to:
Posts (Atom)