31 October 2022

Terrain: Two Fantasy Houses - TTCombat

 Back when I started writing Guilders: A Life In Shadows I needed a fantasy city quickly. And I've been wanting one for many years. So I bought a bunch of cheap TTCombat kits. Might even have been bougth at some Black Friday deal to get it extra cheap. 

TTC have a line of super cheap small 25mm WWII building. The doors don't really look 25mm - but that's hobby scaling for you. 

Video: I Did a small video talking about these buildings and what I've done to them. 

Building: I've covered the complete upgrade from WWII to tudor style fantasy house before. So for the step-by-step you can check out this blog post. Same techniques used in this one. 

Set: Village Bakery

The first kit is the 25mm village bakery. I've made mine into a smithy instead. Instead of the greyboard awning, I added some actual fabric for a more realitic look. I found the Griswold smithy sign somewhere online. Tweaked the colors a bit in google photos. Printed and glued to cardboard. It's simply superglued to the bbq stick I added to the house. 


As with all my buildings I want to have as much of color as possible. I also look at the different buildings, so to mix up roof color, plaster and timber frame colors. The storm shutters and doors etc. I want it different across the entire city. 


The forge is not glued to the building. It's a Mantic Games terrain crate bit, can be moved around. It fits nicely against the wall. 


As always I've added walkways around some of the roof, for better thief acrobatic actions. 


Also posters are always added here and there. This time they're all from first Dunkeldorf kickstarter.

Maison Belle
The second house is another Maison Belle house, also from the TTC 25mm WWII range. By mistake I ordered two of these houses. So I made sure the change the timberframe a bit, use different colors and put the walkway at a different height. 


There's walkways on both sides of the house.


If you check out this shot, you can see how 25mm seems a bit of. The Fireforge peasent is 28mm (on the larger, heroic scale end) and he has plenty of room not to bump his head on the door. 


Each time I do one of these house I get better at detailing the walls. The thick cardboard rocks, the cross beam. All details that break up the flat MDF surface nicely. 


All buildings in my city have a 8mm-1cm wide flat top, so miniatures can walk across the roof top. 


A quick side by side shot of the two Maison belle houses. It's before the new one was finished. But it shows the massive diffence in detailing from my pre-paint work. Coffee stirrers instead of icecream sticks. Stones added at the foundation and painted bricks on flat areas. 


Thanks for reading people. 

As always make sure to follow some different SoMe. I use all the platforms differently. And if you like a great forumstyled community, come check out the Discord. Best hobby people around are in there. It's a very nice place. 

It's all on LinkTree.


25 October 2022

Sludge: Line Infantry

 A big part of the awesome Sludge look is from massive groups of Line Infantry. The multi-miniature bases is such a good idea to get a mass battle look, with quick movement. 

I wanted to field two huge groups of Line Infantry. So I've made two full regiments of 6 bases. So that's 12 bases of three miniatures. 

My infantry is made almost entirely from Wargames Atlantic WWI French. The box is awesome and comes with 35 miniatures (and 70 gasmask heads). I wanted my army to look uniformed and spend quite a bit of time planning where to use which bits. 

All my Line Infantry is armed the same way, there's a few (like three) bodies from Napoleon Elite French, to have enough bodies. All have added toilet paper / super glue cloaks. I've used a mix of backpacks from both the WWI and Napoleon kits. In order to have as many different looks as possible. 

The Command bases are the only one to feature conversion work. I've used Perry Miniatures pike arms for the banner flags. The drummers are made with bit box magic. Warhammer bits. A dwarf and empire drum. Drumsticks made from arrow wielding arms. Straps from paper and super glue. 

The sergeants are made to look like my Shock Troopers. The have bear pelt hats (a cut and glue job with a wwI head), bucklers, pistols and a different style mask. These come from the ranks of shock troopers and heavy cavalry. So these will all have the same kind of head.


Painted line infantry
I decided quickly on a paint scheme. Yellow and grey for the uniform, with black and red spot colors. 

The primary concern for the project was getting it done quickly. Paint quick base layers, nevermind small mistakes, only have one brown (the base coat), wash, drybrush and done. 

The miniatures are all washed in strong tone and drybrushed with dark sand all over. The cloaks have been washed in different types, strong, dark, flesh wash, light and soft tone. To add some variation on that part. 

Banners
I've used the excellent Coat of Arms maker online, tilted the shields and turned them into banners for the army. I have some excellent decals from Carthage Must Be Destroyed, so took an animal for banners, that I also have decals off. 


Show some love
If you want to try Sludge, then go and check it out from Wargames Vault. Blaster also contains all manner of other cool stuff. 

I post lots of miniature stuff on different platforms (and use them differently), so go drop some likes and follows through Link Tree.

10 October 2022

Terrain: Carriage and Wagon

 Wagons add a lot of life to a any fantasy board - be it city of farmstead. I want to have lots of wagons and carts parked around my fantasy city when it's all done. 

I also want some colors on as much of my city as possible. So my wagons will all have some colors, besides just brown wood. First up is a nice big Reaper Bones wagon. It's a good chunky terrain, with room for miniatures in the back. 

I've painted it wooden brown, red outside with green wheels. The straw in the back is just yellow static grass added with a tiny bit of super glue. This is a really playable piece, adding height and cover for games. 


The farmer is a straight up Fireforge Miniatures angry peasant. A great kit for making a bunch of civilians for a game like Guilders: A Life In Shadows


The second is a carriage 3d printed by a friend. I found this one on thingeverse - it also has a detailed interior - but I haven't done anything for that. The inside will never really be used in my games anyway. 

There's a heist in Guilders named 'The Carriage', where that's the target. So I wanted on what was a bit more than a peasents wagon. I've painted it in the same colors as I've done my city guard - so it'll fit well with the city's king or nobles. 

For this build, it was the first time for my trying the speed paitn white - which I could not make work in any way. It just turned out grey for me. ... so in the end I ended up drybrushing whie on the roof. Will have to see if there's any tips for making the white speed paint work, I like speed paint for terrain. 

I will need to fix up some pole thing for pulling the cart and paint up a couple of horses for it. That comes later at some point. 


Support my projects
Remember to show some love for the SoMe platforms, help Guilders: A Life In Shadows and the blog grow. Jump onto LinkTree and drop some likes all around. There you'll also find the current rules for Guilders and the Guilders Lite Edition for an easier read. 

Guilders is a 28mm campaign skirmish game for pvp / solo / coop about thief guilds in a fantasy city. 

Affiliate
Wargames Vault / Drive Through RPG Affiliate. Click the links to support for 14 days. 

5 October 2022

Terrain: Barracks


This blog post was originally written as a feature for Uncle Vanyas, an excellent little compendium made for Zona Alfa. If you want to check out a really cool community, head over to Stalker7, Patrick Todoroffs play ground.
----

"Alright kids gather around and listen to old Uncle Vanya. I got another tip for you, a good place to look when you're inside the Zone. The the anomalies started and everything went to shit, all manner of forces moved in here to control and contain it. Both the army and those bloody UN peacekeeping tourists. The all set up FOBs - before knowing what was going on!

Now you can find these FOBs all over the Zone, huge areas filled with those nissen huts, prefab steel barracks - we call the tin coffins around here. The thing is, they're often filled with good stuff. The Zone is filled with them! Sometimes soldier boys leave those FOBs as part of a mission, just leave - might come back and use them later. Cheap to build, so just leave 'em. Might forget or leave common stuff. Sometimes they have to evacuate quickly as anomalies shift or they just all die from some weird stuff.

That's the tin coffins you really wanna find, a base left in a hurry. Just keep your fucking eyes open! You might find NVGs, MREs, boxes of Igolnik rounds - or some weird deadly shit. Had a guy try to light a campfire with scavenged fuel, it turned out the jerry can was filled with Hellslime - blyat, what a mess.

Where to look? Well there's manned bases around the edge and near the checkpoints, but you can find the abandoned ones deep in the Zone. Sure I know a few tin coffin graveyards. Here give me your map, I'll mark out a few."


Let's build some super cheap, scrap material terrain - the well known corrugated steel barracks.

Materials: Oversized tin cans, thick card / mdf, duct tape, masking tape, sand, wood glue, spray paint, cheap acryllics
Tools: Metal shears / grinder, hot glue gun (optional), knife, cheap brushes.
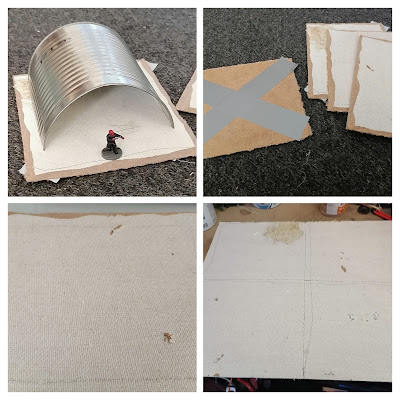
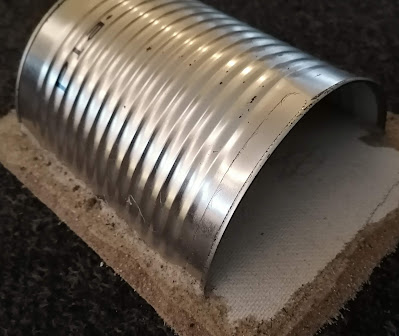

Step 1 - Cutting the can
Get your oversized tin cans. These are the ones they use at the pizza place, deli or restaurants. I found my first in dumpsters at the store and then got some from my pizza guy. Mark them in half and cut them with metal shears (it's a bit tricky at the bottom). You can also use a grinder, it's faster but it's a two man job.


The tin cans will bend when doing this (either way), but it's easy enough to fix, so don't be alarmed when they're out of shape.


Step 2 - Making a base
Time to make some bases. Not much to it. Use mdf, cardboard or whatever else you have lying around. I found some discarded board in my school's arts and craft room.

Make an X on the back of the base with duct tape. Do this on all your terrain, always. The X will add some tension to the base and it prevents a lot of the warping you often get from using wood / pva glue on bases. All my homemade terrain has this X underneath.


Use a sharp knife to angle the base edge, we don't want that steep 3mm edge. Angle it out, nevermind it not being completely even.


Step 3: Gluing it down

Place the half can on the base and draw around it with a pencil. I used a hot glue gun for mine. Contact glue will work as well or PVA (though this is not the best option). If using pva, use a lot, at pressure on the barracks and let it dry completely.


Sand up the edge of the base. Use this time to strengthen the bind, I added lots of glue and sand on the edge of the barracks (inside and out) - to keep it in place. Perhaps add more than one layer. My hard board had some nice texture, using that as concrete in this build.


Part 4: Painting made easy

All my terrain is nearly completed with cheap spray paint. Saves time and is damn quick. Paint the inside and floor grey first. Then use paper to mask the floor and paint the barracks green. Then mask with paper and paint the sand brown. Five minutes and you terrain looks decent.


I wanted one to be a medical bay, so using masking tape I made a square - spray white. Then using smaller pieces of masking tape made out a cross - spray red. Make sure previous layers is completely dry before adding masking tape.


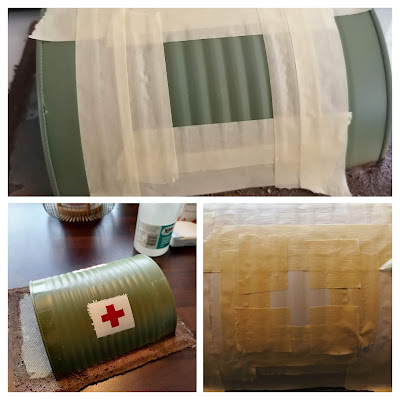
Step 5: It's all in the details
Repair the outline of any stencil with a finer brush and hobby paints. I've also added some details to the barracks with chess piece markings, painted free hand. In Escape from Tarkov the military base buildings have call signs based on chess pieces - making for easy identification. Fun little detail.


We need to blend and tone this spray paint layer. I use a homemade brown wash for all my terrain. Cheap brown and black acryllics, dishwash soap (a few drops), water and PVA. Splash the entire thing in it, a few layers. Flick that paint brush as well for some stains.


Lastly add whatever static grass and tufts you want to the base.

Showcase
All finished up! Here's some quick to build, super cheap terrain pieces that'll fill out a lot of space on your board. This build is easy to make for other settings as well. I plan on making both a couple of all white red cross ones and some yellow / blue FEMA ones.


If you enjoyed this, please check out my blog: Bloodbeard's Garage for more cheap scrap material builds.


Let's see a couple of stalkers getting into trouble at an abandoned army FOB.