14 September 2018

Tutorial: Store signs and awning

I have some very nice, small, basic brick houses by Laser Model Store. Unlike my TT Combat brick houses, I haven't added graffitti and posters to those buildings. They are nice as administration buildings for the prison and figuring they could be nice shops as well.

Used some 4Ground kits to make many different store and some dollhouse furniture to make restaurants.

Decided to make some signs, that fit right into the windows, to easily making out the buildings as different stuff.

Check out the showcase at the bottom of the article and see the Modern Terrain Hub here.

Materials
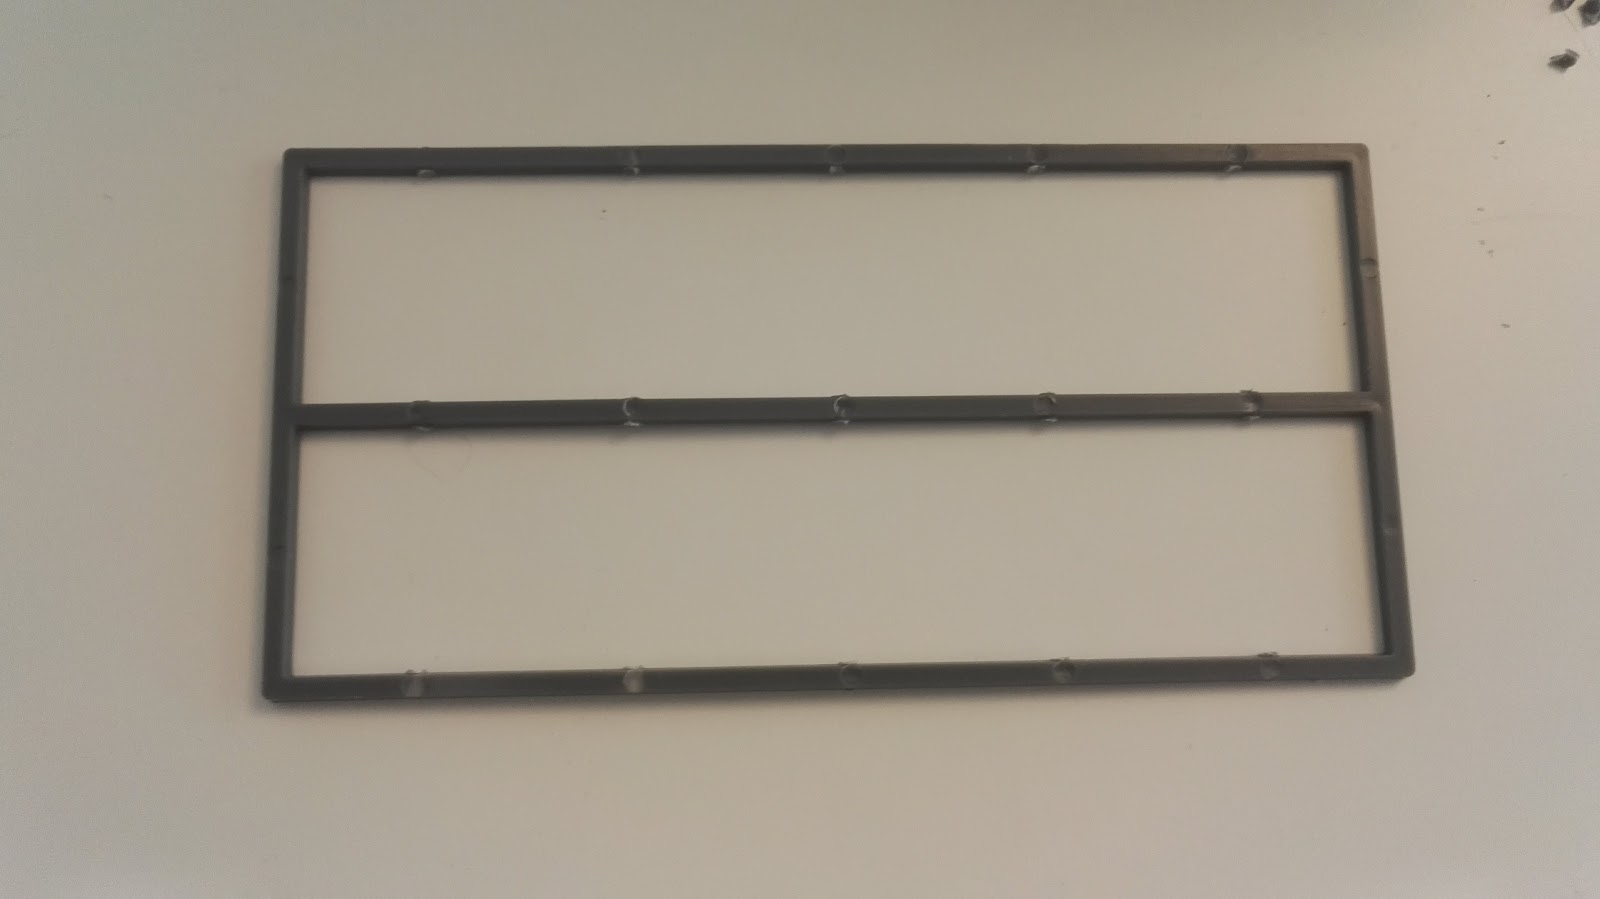
  •  Mantic 25mm round bases sprue
  • Plastic and super glue.
  • Candle light
  • Printed signs and fabric


Step 1
Cut out some pieces like this from some old sprue. The outer pieces are gonna be hooks and the middle is to support the sign.

Step 2 - candlelight
Use a candle and heat up the plasitc. Bend the plastic twice to get a hook. Make sure this hook can fit over the wall thickness of your MDF building. Most buildings will be two layers - so 6mm. I've aimed for the hooks to be that wide.


 Step 3 - print the signs
I just a bit of seaching on Google. Found a gun store sign, a general store sign and made the police station sign myself. Took a photo of the logo on my police cars and using MS Paint I made a police station sign.

Printed out, I glued them to thin cardboard with wood glue.

Andy's Gun Works Top - download
Andy's Gun Works, Kwik-W-Mart and Police Station - download 


 Step 4 - glue 
Glue the sign to the sprue hook from earlier. Use super glue.


Awning
Made an awning in the same way. Took Mantic base sprue, made some hooks with a candle, strengthened with some extra sprue. Added super glue to the entire thing, press it into a piece of fabric. When dry, cut the fabric into shape.


Showcase
Here's some photos of the result. A short amount of work time, free materials and the same little building can be turned into so many scenario specific buildings. Homemade felt mat - tutorial.


Tutorial for scrap material fire escapes here.


11 September 2018

Terrain: TT Combat Dino Gas Deluxe

A gas station is a must have piece of terrain I think. I've been wanting one for a long time. It's a perfect place to scavenge in The Walking Dead and Last Days. But it's also a great center piece for This Is Not A Test (because they are iconic in Fallout).

You can skip the MDF kit tips and tricks and scroll to the bottom - that's the showcase photos.

This is a great center piece for scenarios and an urban setup. You can see the Modern Terrain collection here.

Prepping
Before assembling a MDF product, I always sort of the bits and base coat them. I've seperated the pieces in piles for grey, black, white, green and red. It'll let you have a usable piece right after assembly and it really makes the remaining painting easy.


The only pieces assembled before base coating are the petrol pumps.


The dinosaur sign I coated green, then covered the dino in masking tape and painted the visible part red.


I've never tried having a miscut MDF kit before, but this turned out to be. The house have lots of walls not fitting as I'm used to with laser but stuff. Couldn't make sense off it. After assembling the roof, I was sure there had been a problem with a cutter. TTC are good guys and offered me a nice voucher as a sorry.


The worst was the long lines in the roof was hidden with masking tape, with a few drops of super glue for it to stay in place.


The two roof parts attach together, meaning you can't take the roof of the gas station, without messeng around with the half-roof as weel. So I decided to add two small legs to it, so the half-roof could balance on its own. Allowing the gas station roof to be removed for inside play.


Painting and detailing
After base coating there was only a bit of painting to do. Make out letters, add some metal details on the petrol pumps and other minor stuff. Varnished the entire thing in Quick Shade and added a bunch of birch tree seeds to the roof.

Printed some posters and graffiti on paper, glued it on with super glue. 

Download: Graffiti
Download: Posters

Showcase
Photos of the finished build, really happy for this piece. Homemade felt mat - tutorial. And there's a tutorial for the fire escape ladder here.


Added a little Tarantino reference with a Red Apple Cigarettes poster.


Graffiti was found with a Google search. The Blues Brothers posters are just cool - love that movie.


The tool furniture is part of the 4Ground terrain hardware store interior. A very good kit. Put a review here.


9 September 2018

Tutorial: Fire Escapes and Ladders

MDF buildings are a great and cheap way to fill out a board. But having a couple of different houses, most just come with one door. The limits the gaming options with then, creating nasty choke points (which is fine sometimes). Decided to make some entry points on the second floors with some fire escapes.

I made two different kinds. One angled type for my Laser Model Store houses and straight for the TT Combat houses.

The fire escapes are made broader than 25mm, because I want them to fit on bigger models as well. This wouldn't be a problem in Last Days and Walking Dead. But I do have some mutants for This Is Not A Test and Scrappers that has bigger bases.

The finished result can be seen at the bottom of the article.

Materials

  • Sprue (I used Mantic Games bases sprue)
  • Plastic glue
  • A tiny bit of plastic card (could work with sprue as well)
Step 1 - prep the sprues
Mantic Games 25mm round bases come on perfect sprues. The are straight and have 90 degree angles. Prepare by cleaning them up. Glue two together to make the angled fire escape.


Step 2 - cut off
Cut off the extra sprue, to make a nicely shaped angle.


Step 3 - railing
Making use of the nice angles on the sprue, it's easy to cut out and attach some railing to the fire escape platform.


Step 4 - playing with fire
Use a candle and heat up some sprue. Bend it into a hooked shape. These will be used to secure the fire escapes in the windows of the houses. Bending with heat is better than glueing - it's much stronger. This is the bit that will take any tension.


For the straight fire escapes the hooks are bend directly from the base frame, no need to glue. 
MDF houses is often double layered on he walls. So aim for a 6mm wide space in the hooks. 


Step 5 - finishing
Attach the hooks to the angled fire escape. Make sure they fit with a window in the building.


The Laser Model Store has a small line sticking out at the second floor. So using a bit of sprue and a tiny bit of plastic card I made grip to get around that. So the fire escape is secured on both sides.


Lastly add as much sprue as you want to walk on. Fill out the fire escape. Add some extra sprue to the railing as well. 

Ladders
Again using a candle, med some hooked pieces of sprue. Use these to make some ladders. I've made six short and two long fire escape ladders. These can hook on to the fire escape, make further access to a roof. 


Painting
I base coated the ladders and fire escapes with a brown spray. Drybrushed it all with gun metal. Quick shade varnished the stuff with a heavy layer. It's an easy way to get a dirty rusty look.

Showcase
I think the addition of the fire escapes add a nice inner city downtown vibe to the buildings. Here they're used on a TT Combat house.


Homemade felt mat - tutorial. Fire escape on a Laser Model Store house.


6 September 2018

Terrain: TT Combat Apartment Building A

I already have two modern brick houses from Laser Model Store. Wanting a few more I went with TT Combat buildings, the price of TTC buildings is only a bit higher - but they have a much larger floor area.

Before ordering these buildings, I had no idea about the interior (or missing interior). Two things to keep in mind when buying TTC apartment building A and B.

Apartment building A has no second story inside, only a floor space.

Apartment building B has a second story floor. But the inside of the ground floor, is not aligned with the doors. And there's laser cut letters in the floor.

Great value products, but a bit of work needed to make them perfect for games. See all the urban stuff in the Modern Terrain Hub.

TT Combat Apartment Building A
I was surprised to see that this building was actually only a ground floor with very high walls. There's some detail lines in the middle of the walls. Using a new hobby knife I separated them in two pieces.

Prepping before a build I also paint as many pieces as possible. Using spray paint I base coat the building before assebly. White for windows and doors, mat red for outer walls and grey on the inside. It saves a lot of time over painting after assembly.

After assembling the building I decided to add inner walls, to make the buildings better for gaming. I used thick 3mm thick card board, gotten for free from a book store (it's the card books is separated by when they get them).


The second story floor is made from 3mm cardboard as well. Cut to fit just inside the walls of the house. A perfect fit, the floor is strong.


Last details
Other than the spray can base coat the painting is very limited. A bit of extra white around the windows. Then the entire building was giving a layer of Army Painter quick shade varnish. Added a few small news papers and birch tree seeds as leaves.

The graffiti was found with a google image search. Inserted into Word, printed and glued on with wood glue. Also covered with quick shade they blend in decent on the wall. Also printed a few posters.

Download: Graffiti
Download: Posters


A little reference to a favorite movie maker of mine. Big Kahuna Burger and Red Apple Cigarettes advertisements.


Absolutely loved the Why So Serious piece I found on the internet. Always good to bring some Batman into game worlds.


The carpets are just pieces of fabric, strengthened with some super glue around the edges, keeps them from wrinkling.

The interior terrain is cheap 1:50 scale dollhouse furniture. Full tutorial here.

The stairs to the second floor are designed and printed by the good guy behund Hedegaard Designs.