
For my first game of Hardwired I decided to just go for the introduction scenario in the main rulebook.
Mission
Mission
A transport ship have been shot down and scientist need to be extracted from the zone. The scientist is protected by two security troops and has a killswitch implanted. Get to the VIP, disable the switch, exfiltrate the VIP from site.
Setup
I setup a bunch of different stuff from my terrain collection to build an industrial zone. Besides a few MDF shipping containers most of the stuff is scratch build or upgraded toys. Made sure there would be plenty of cover for myself and the enemy troops.
Most of the stuff will be covered in either the modern or industrial terrain pages.
Most of the stuff will be covered in either the modern or industrial terrain pages.

The Team
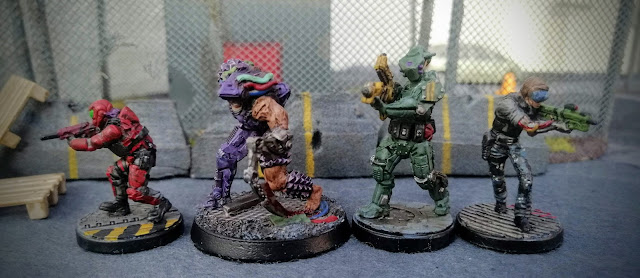
Strike Team Alfa is made up with four models from Human Interface. I just picked some cool ones. If one dies during the mission, he'll be retired as a model for now - it's a great excuse to paint up another model for the game.
From left to right it's Spotless (medic), Brick (heavy shooter), Gator (shotgun), Conduit (hacker).
From left to right it's Spotless (medic), Brick (heavy shooter), Gator (shotgun), Conduit (hacker).
The VIP is a nasty piece of work, doing highly illegal body modifications. He's been taken captive by hostile security. My agents are hired from a corporation that need a man with these shady skills, so he has to get out alive. He's protected by d6 rent-a-cops.

For games like this, I like to roll for random deployment edge. My team was coming into the area from the container yard, lots of very heavy cover to stay hidden behind, while moving towards the objective.

To make good speed every action is poured in to moving towards the objective. Get to the VIP and disable the implant, before there's too many h-sec troops to avoid. The splicer Conduit is fast and run ahead.

Led by Conduit, two other agents Spotless and Gator advance on the flier as well The two security troopers who survived the crash are quickly dealt with and Conduit is able to disable the kill switch on the VIP.
The first couple of turn are over and h-sec start pouring into the combat zone. The first d6 troopers is not much of a challenge, with all the cover around and only one actino - it'll take them time to get into a firing position.

Rolling for random entry points can be good and bad for my crew. For the first two turns, I'm lucky that the h-sec is deployed on the flanks and not on the route I've chosen for the extraction. Twice the enemies arrive on the wrong side of the downed flier - which is hiding three of my troopers.

While the team is moving on to the flier, the brute of the group - Brick, is staying behind. He's armed with a heavy weapon, firing a small template. It also makes him slower than the rest of the team, setting him back 1" for every movement action. His job is to provide covering fire for the rest of the team.

Objective clear and the VIP is ready for extraction. Sawbones Spotless will is better at moving fast, and he'll be moving with the objective towards the clearest board edge. Gator and Conduit will stay back and start taking out the h-sec troopers entering the area - and there's starting to be a lot.

Gator takes out a few with his shotgun.

There's relatively bad cover on the way to the extraction. A few h-sec have entered the area behind the silos. So the scientist and Spotless are forced to hug the bad cover of a bus stop and chain link fence.

After having blasted away with the shotgun, only one h-sec trooper is left on the right flank. This security is left without any actions, as Conduit blasted off a flashbang earlier - and Conduit can then pick him off with a shot from his SMG.

Now the more dangerous enemy troopers start entering the board d8 h-sec with two action points. Definitely bringing up the danger in the area. Swarming towards the downed flier, it'll only take them a few turns to get around it.

A tier 2 enemy trooper near the bus stop, super close range to Spotless, who's lucky to not get badly wounded from his fire.

Spotless is quick to return fire and brings down the enemy trooper standing in the way of exfiltration. The VIP is able to exit the table - and the game is technically won. But for the added action I want all my guys to make it out.
If some of them should die, it'll be a good reason to paint up even more guys.
If some of them should die, it'll be a good reason to paint up even more guys.

As Brick has not had any good clear shots for a few rounds, he's started to make his way towards the extraction point, slow going for the heavily armed agent. As it's clear the enemies are starting to look like a swarm, that'll be a lot of shots to shrug off in no time.

Hardwired is a quick and deadly game, as this is only the end of turn 4 and a huge amount of d8 h-sec enter the board. And this time the enemies enter right in front of my team, who's trying to extract. The mission just turned very deadly.
And this is where the mechanics of Hardwired really come into play. My agents will not be able to get out with their free move action - so they need to roll a success for another move action. But Brick will not be able to get out this turn no matter what.
So what to choose? Use an action to get off a shot? Or be certain to get out and not shot to pieces.
Sawbones who's good a support rolls a good buff on Brick and drops an EMP that take out a robot. Conduit the splicer is able to hack and take over another robot. Then then move out of the area. Gator has a lot longer to move and use his actions to get out.

And it comes right down to the wire. In the end Brick is only just making it out alive. He failed a couple of the rolls for movement. Had he failed just one more roll, he would have been blown to pieces. But in the end he makes it out, wounded - but alive. A huge succes. 5 rounds of combat the mission took.

Aftermath
I really like how the system in Hardwired works. The dice mechanics are easy to remember and there's a real sense of impending loss. If you're not in a good position you will loose to the d10 troopers. Glad I made it out in time.
I'm looking forward to playing more Hardwired and starting using the rules for sentry guns and surveillance towers.
I'm looking forward to playing more Hardwired and starting using the rules for sentry guns and surveillance towers.
Loved the battle write up! But the board you put together... that thing is truly a work of art! The fact that it is completely modular is something to drool over. "Shit happens" on the porta-potty is a nice touch lol.
ReplyDeleteThank. All my boards are like this. Lots of different pieces and scatter, så I can build different setups for many games and scenarios. Nothing here was build for the specific, just made of stuff I already had.
DeleteOutstanding write up, and the board and minis are excellent!
ReplyDeleteNot sure how to subscribe or like I'm a blooming luddite.. looks fab ..
ReplyDeleteWith d8 more opfor coming in each turn, it sounds like it's got a heavy miniatures demand.
ReplyDeleteI meant to add:
Delete... But tell us more about team creation.
It's not d8 new models however. It's the dice type the models use. First enemies only use d6 for rolls, next use only d8 and last use d10 dice for their actions - that's how hard they are.
DeleteFirst turn is always 4 enemies, second is 6 enemies.
Third is 4 models, fourth is 6 models.
Fifth is 4 models, six is 6 models.