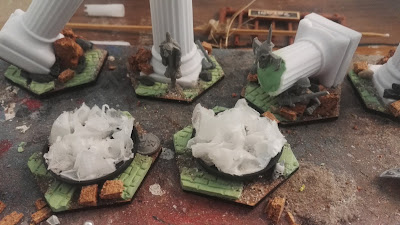
My best mate (and the guy I've played a lot of Frostgrave with) plays a lot of Shadespire, do a lot of tournament games. So I decided to make him some 3d terrain tiles as a gift, up the game a bit. Here's a blog about what I did.
Sroll to the end for the shaowcase photos. And check out my terrain page for a lot of other scratch building projects.
The bases are from Green Stuff World, cheap and perfect size.
Pillars
I used with cheap china wedding cake pillars for Frostgrave terrain. They seemed perfect for Shadespire as well. You can find these for cheap on AliExpress and Ebay. Cut them up, glued to bases with superglue. Added some rubble from a cut up Ikea heat protector.
Filled the pillars with some tin foil. This is done to save some miliput filling in the top.
Fill the top with miliput (I mix it 50:50 with Play-Doh to make it cheaper). Add other details from your bit box. Added some banner top skills, a spikes goblin (sculpted by Admiralty Miniatures).
Molten Gold
For the molten gold tiles (expansion boards), I added a resin rune stone bit. Also used some half-beads in different sizes. Found these cheap online. Perfect for making bubbles in slime, molten metal and swamps.
Added a thick layer of wood glue to the base afterwards. Breaks up the flat surface and gives a liquid look.
Braizers
For the three lethal tiles I wanted to make some braziers. I used upside down 40mm round bases.
I make flames from cheap toilet paper and super glue. Rip up small pieces of toilet paper. Roll it up and glue in place with cheap super glue. Drip some super glue on top to harden it all. Repeat till the braziers are full.
Melting pots
Using Ikea heat protectors (cheap cork board), cut out small bricks. Used small pieces of cork left overs to make burning coals.
I found some eggcups fitting the tile size. Perfect looking melting pots. I scratched them with sandpaper for the paint to better stick. Add molten gold with a thick layer of wood glue.
Using a lit candle, I bend some left over sprue into shape. Added a dwarf shield to the side and glued to the melting pots.
Tiles
Using the cheap mix of 50:50 miliput and Play-Doh (it still hardens) I rolls out some tile work. I'm using a Green Stuff World rolling pin. The brick on this one resembles the printed graphics on the boards really well.
Let it harden and then cut up small pieces to add various places on the 3d tiles.
Final details
Add final details to the builds. Add sand and cork rubble to places without miliput tiling. I've also added a skeleon, skulls, weapons, shields and other minor details. Paint it all up and add some flock.
Showcase
The finished pieces using in a few games of Shadespire. I'm very pleased with the painted result, considering I didn't have the boards on hand myself.
Follow the blog
Let me know what you think here, on Facebook or Instagram. There's also a widget on the site to follow the blogger page. The blog is non-profit. It's a personal log and part of my hobby fun. But your interaction and following is highly appreciated.


No comments:
Post a Comment
Note: only a member of this blog may post a comment.